After we had a look at the hardware, let’s have a look at the overall architecture of the system. Consider reading my first blog post about this project to understand the background of the implementation.
Overview
After some general testing and looking around technologies, I decided on the protocols and libraries I want to use. Over time, the following architecture developed:
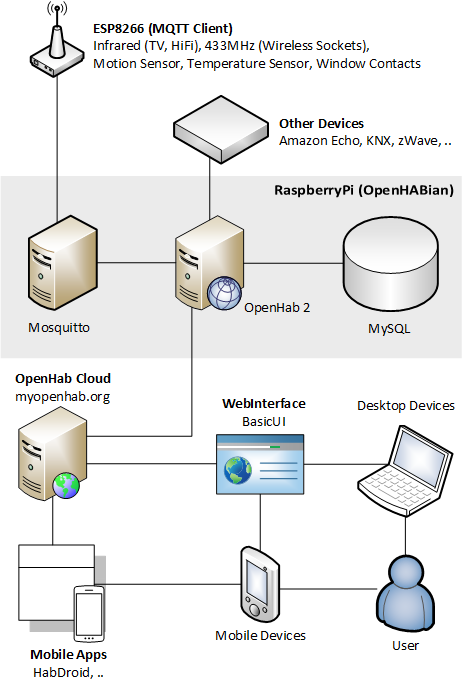
To be precise, I only decided on the use of MQTT as the communcation protocol in the first stage. The utilization of OpenHAB 2 came up later on.
MQTT
MQTT is a very lightweight protocol developed by IBM. It implements the publish-subscribe-pattern. This means that you can subscribe to a topic (a simple string like bedroom/temperature). Every message published to a specific topic will be received by all subscribers of the topic.
MQTT needs a central server, the so called ‘broker’. It handles all subscriptions and the general communcation between the clients. I use Mosquitto as a broker, which is a project from Eclipse.
There are a lot of client libraries out there, I think the Eclipse Paho project is a very popular one. MQTT also supports SSL and authentication with a username/password, but it’s recommended to encrypt the messages themselves because SSL causes a lot of overhead to the lightweight protocol.
OpenHAB 2
OpenHAB is a vendor-neutral solution for automating the smart home. It’s developed in Java and therefore runs almost everywhere. I installed it on a RaspberryPi 3, but I will move it to my Synology NAS in future. OpenHAB is fully open-source and has a huge community. There’s support for almost every smart device out there on the market so the decision to use it was quickly made.
Since version 2, OpenHAB also provides the ‘Paper UI’ as a user-friendly solution to add smart things, configuring them and creating automation rules. However, since this UI is still not completely stable and fully featured yet, I prefer to mess with the configuration files and having more flexibility - the syntax is also pretty easy to understand.
I connected OpenHAB with a MySQL database (running on my Raspberry anyway for a little web-app) to persist some data (for example the temperatures over time). Next to mosquitto/my ESPs it also interfaces with my Amazon Echo Dot as well as some Samsung TVs, Wake-On-LAN devices and other stuff.
I’ll go into more detail on my use of OpenHAB and the connection with the free OpenHAB Cloud for external access in a future post.
Development Environment
After we’ve seen the high-level architecture, we should also look at the base for the development of the ESP firmware.
As the ESP8266 has grown a big community, there is also support for it in the Arduino IDE. The Arduino IDE itself is hiding some details by default to make the first steps of programming microcontrollers more easy. Although this can be very helpful, I changed to a basic C/C++ IDE to have more flexibility.
I used PlatformIO as a base, which brings along all the toolchains, uploaders and frameworks for the ESP and many other boards with it. Furthermore it has a great integration with numerous IDEs and also supports Continuous Integration.
You can find the source code of the firmware on GitHub.
Conclusion
Rather than using manufacturer-specific base stations for each different technology, we use OpenHAB with it’s huge amount of add-ins. It also interfaces with MQTT through which we easily communicate with our ESPs. This creates a good base to rely on and is a big step to the own smart home.
In my next post we’ll have a detailed look into the programming of the firmware.
Comments